YouTube Live is so big, it’s almost unbelievable how much time people spend watching content live on the platform.
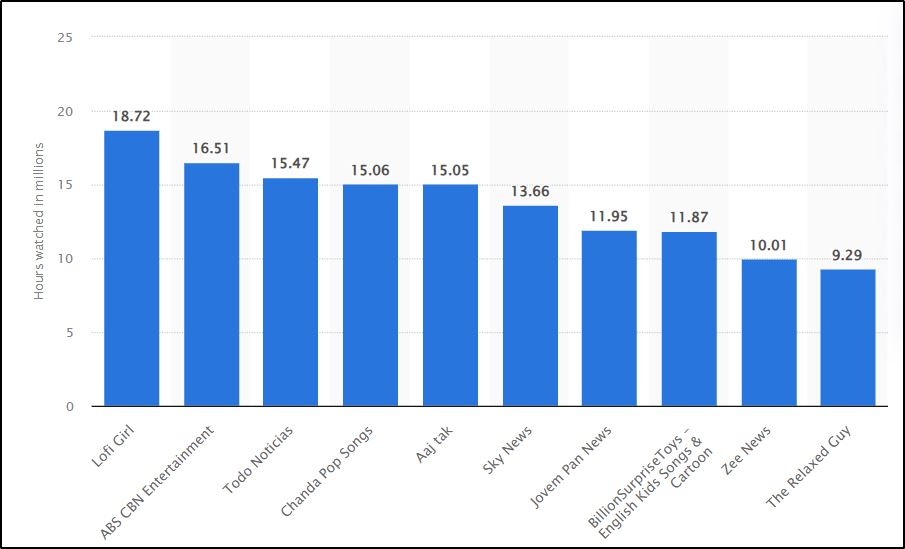
For example, according to Statista, the YouTube channel Lofi Girl was the most popular live-streaming channel on the platform in September 2022 – with users generating 18.72 million hours watched.

But live streaming on YouTube gets way better with StreamYard.
Instead of basic broadcasts, StreamYard lets you add pro-level features—like branded logos, screen overlays, and seamless guest invitations—that make your content stand out.
It’s designed to keep your stream looking polished and lets you manage live comments and cross-stream to multiple platforms without breaking a sweat.
Want to give your live streams a professional edge that attracts more viewers and builds your brand?
Here’s how to use StreamYard to take your YouTube live streaming to the next level.
How StreamYard to YouTube Live Streaming Works

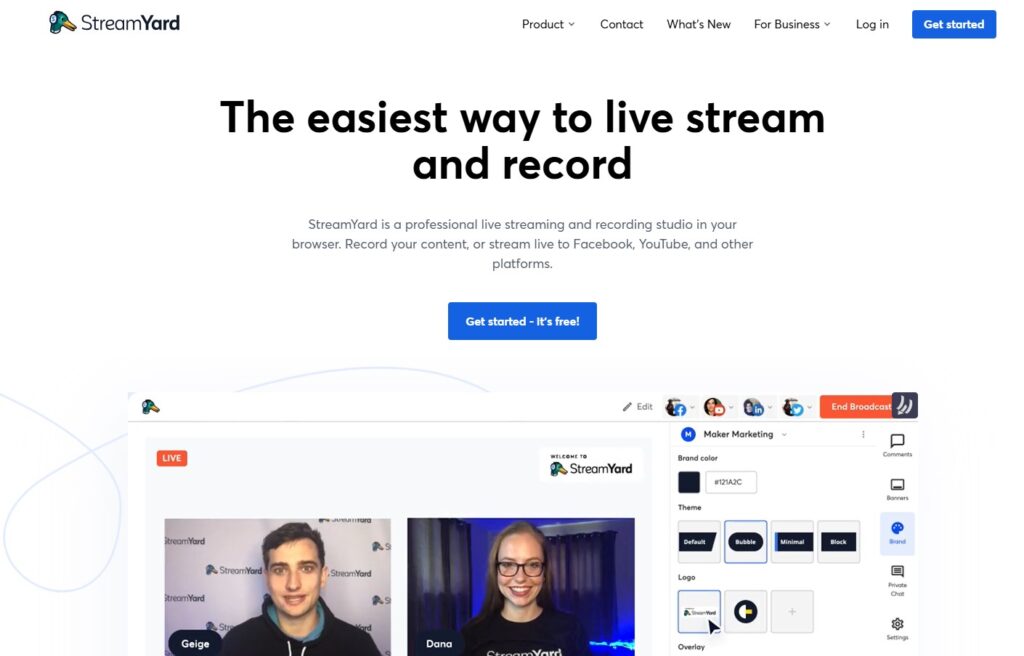
StreamYard to YouTube live streaming is a simple and user-friendly process that lets you broadcast high-quality, branded content directly to your YouTube audience using StreamYard’s live streaming features.
After signing up on StreamYard and linking it to your YouTube account, you’re set to create and customize your live stream.
StreamYard acts as a virtual studio where you can add logos, adjust layouts, invite guests, and even share your screen.
With just a few clicks, StreamYard sends your polished broadcast to YouTube, reaching viewers live and allowing real-time engagement—all without needing any technical setup on YouTube itself.
How To Live Stream On YouTube Live Using StreamYard
To start broadcasting live streams on YouTube using StreamYard, you’ll need to set up both YouTube Live and StreamYard accounts.
Here’s a step-by-step to get you live-ready:
Step 1: Prepare Your YouTube Live Account
If you have a Google account, you already have a YouTube profile—just head to YouTube and log in.
Set up your YouTube channel by choosing a name, profile image, and cover photo that reflect your brand.
Then, enable live streaming in your channel settings.

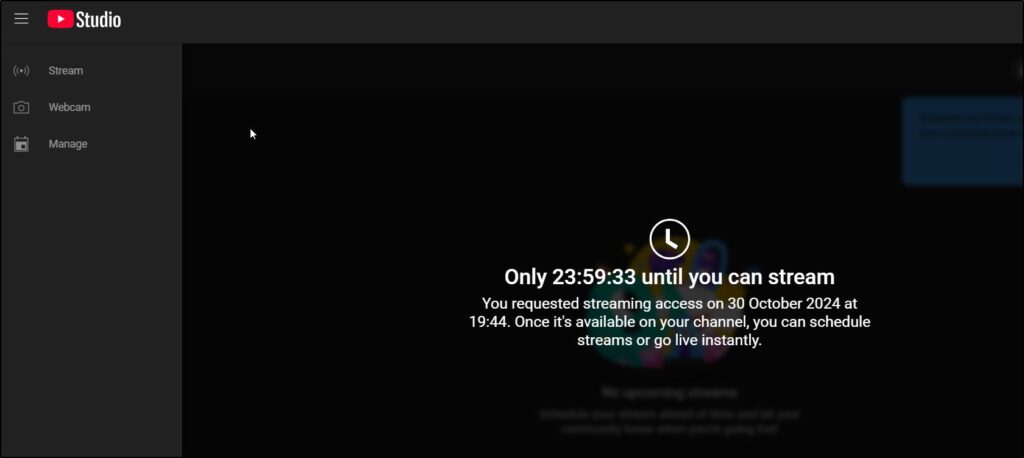
YouTube requires channel verification for live streaming, which takes up to 24 hours.
So, make sure you prepare your channel in advance for live streaming.
Step 2: Create a StreamYard Account
StreamYard simplifies live streaming with a quick setup. Go to the StreamYard website and sign up using your email or Google account.
While the free version offers solid features, a premium plan unlocks tools like custom branding and multistreaming options—worth considering if you’re serious about creating professional broadcasts.
Once both accounts are set up, you’re ready to connect StreamYard with YouTube and start streaming. Let’s get into that next.
Connecting StreamYard to Your YouTube Channel
Now that your accounts are set, let’s connect StreamYard to YouTube for a seamless streaming experience.
This connection allows you to go live instantly, access advanced broadcast settings, and make the most of StreamYard’s production tools right from your dashboard.
Getting Started with the Connection
Open your StreamYard dashboard, and look for the “Destinations” tab in the left-hand menu.
This is where the magic happens. Once you click on it, select “YouTube” from the list of streaming platforms.
StreamYard will guide you to a Google login page—choose the Google account linked to your YouTube channel, and confirm permissions.
In seconds, you’re linked up and ready to start creating.
Adding Multiple Channels for More Reach
Want to stream across several YouTube channels? StreamYard makes it easy.
Follow the same steps to add each YouTube channel—just make sure you’re logged into the correct Google account for each one.
Premium users can connect up to eight channels, letting you share content far and wide.
For example, if you have a personal brand channel and a separate company account, go live on both to maximize your reach.
With your YouTube account connected, it’s time to set up your live stream and get ready to hit “Go Live.”
Configure Your YouTube Live Stream In StreamYard
With StreamYard, you can shape your broadcast to look exactly how you want—complete with logos, banners, and layouts that capture attention and keep viewers engaged.
Setting Up Your Stream’s Details
First, select the “Create” button on your StreamYard dashboard, and choose “Live Stream.”
Here, you’ll add the essentials: title, description, and privacy settings. If you’re hosting an exclusive event, set privacy to “Unlisted” or “Private.”
Otherwise, keep it “Public” to reach as many viewers as possible.
Designing Your Stream with Branding Elements
StreamYard brings your branding to life. Upload your logo, set a custom color theme, and add background images to create a cohesive look that screams professionalism.
Picture your logo in the corner, a ticker sliding across the bottom with your latest news, and a well-designed color scheme that makes the whole screen pop.
Using Layouts and Templates for Flexibility
StreamYard’s templates make it easy to adjust your layout based on the content type.
Want to interview a guest?
Choose a split-screen layout that lets both speakers share the screen comfortably.
Hosting a panel? Opt for the multi-speaker setup.
These templates take your stream from basic to broadcast-quality without needing complex software.
Banners and Tickers: Adding Real-Time Information
For live updates, you can’t beat StreamYard’s banner and ticker features.
Think of these as your on-screen helpers: add a banner that welcomes viewers, display your latest course link in a ticker, or post a quick reminder about the next segment.
These small touches keep your stream organized and professional, giving viewers exactly the information they need without interruptions.
With your stream customized, you’re ready to jump into StreamYard Studio and start polishing your live broadcast.
Enhance Your Live Streams In StreamYard Studio
StreamYard Studio is where your live stream truly comes to life, packed with tools to keep your content dynamic and engaging.
Entering the Studio and Adding Yourself to the Stream
Once you’re in StreamYard Studio, you’ll see your camera feed and the main control panel on the right.
Click “Add to Stream” to bring yourself onto the screen—your preview window now shows you live and ready to engage with your audience.
Switching Between Cameras and Screens
Need to showcase a product, presentation, or guest? StreamYard lets you switch seamlessly between different cameras and screens.
You can share your screen in just a click, choosing either your full desktop, a specific window, or a browser tab.
This feature is perfect for tutorials, presentations, or walking your audience through a process step-by-step.
Adjusting Layouts in Real Time
StreamYard’s layout options let you change the screen dynamically. Choose a solo layout to keep the focus on you, then switch to a side-by-side view if you’re interviewing a guest.
For a presentation, use a layout that keeps you in a smaller corner frame while the main screen shows your slides or content—giving a professional, TV-style feel to your broadcast.
Adding Transitions, Backgrounds, and Effects
To give your stream that polished, studio-like feel, StreamYard provides options for transitions and background effects.
Swap backgrounds between segments, add fade-in transitions, and use a green screen to replace your background entirely.
Welcome your viewers with a branded background that gives way to a clean, open screen as you dive into the content.
With StreamYard Studio, you’re not just going live—you’re creating a production that feels planned, organized, and genuinely engaging. Next, let’s make sure it all runs smoothly with a pre-stream test.
Testing Your YouTube Live Stream With StreamYard
Before you officially go live, a quick test run ensures everything looks and sounds just right, giving you the confidence to broadcast without a hitch.
Run a Private Test Stream
In StreamYard Studio, set your stream’s privacy setting to “Private.” This creates a live preview visible only to you, perfect for testing without an audience.
Once you hit “Go Live,” monitor your stream closely—does the audio come through clearly? Is your video sharp and stable?
Checking these details in a private stream saves you from any last-minute surprises.
Double-Check Audio and Video Settings
Take a moment to review your microphone and camera settings under “Settings.”
Select the mic that best suits your setup and adjust the video quality for your streaming needs.
Make sure your lighting is optimal and that background noise is minimal.
Your viewers will notice these details immediately, so a few minutes of adjustment here can make all the difference.
Previewing Your Branding and Visual Elements
Check that all your visuals—like logos, tickers, and banners—are showing up as planned.
This is your chance to refine the look and feel, ensuring every graphic enhances rather than distracts.
Click through each layout and banner option to see how they appear live, so when you do start, everything flows seamlessly.
Gather Final Talking Points and Visuals
If you plan to share slides, videos, or other visuals, load them in advance so you can quickly access them during the stream.
A well-prepared setup keeps your broadcast flowing without awkward pauses or fumbling to find the right file.
Once you’re comfortable with how everything looks and sounds, you’re ready to hit “Go Live” with confidence and make a lasting impression on your viewers. Let’s dive into the real thing.
Go Live On YouTube Using StreamYard
You’re all set up and ready to go live on your YouTube channel using StreamYard Studio.
Starting Your Stream with Impact
Begin by hitting “Go Live” on your StreamYard dashboard. When you do that, your broadcast will instantly go live on your YouTube channel.
Open with a warm welcome and a quick overview of what your viewers can expect. Hook them right away, whether it’s a quick teaser about your topic or a shoutout to those who joined early.
Keep Viewers Engaged with Real-Time Interaction
StreamYard lets you interact with live comments directly on-screen. Acknowledge viewer comments as they come in to make the experience feel personal.
Use banners to highlight key points, ask questions to keep viewers engaged, and let your audience know you’re listening.
Switching Layouts Smoothly
If you have a guest, switch to a split-screen layout so both of you share the spotlight. For solo presentations, use layouts that keep the content front and center while still showing you on screen.
Transition between layouts effortlessly, making each segment feel polished and purposeful.
Utilize Call-to-Actions (CTAs)
Throughout the stream, use subtle CTAs to direct viewers—whether it’s subscribing, checking out a link in your description, or signing up for your email list. StreamYard’s banners and tickers are perfect for these CTAs without disrupting the flow.
Ending the Broadcast on a High Note
Wrap up with a quick recap and thank your viewers for tuning in. Let them know when they can expect your next live session, and end with a final CTA. This closing gives them a reason to come back and engages them beyond the broadcast.
Once you’re done, click “End Broadcast,” and your stream wraps up smoothly. It automatically stops on YouTube Live as well.
Streaming Pre-Recorded Videos on YouTube with StreamYard
StreamYard doesn’t just handle live broadcasts—it also allows you to stream pre-recorded videos as live events on YouTube.
This feature is perfect for creators who want to maintain a consistent streaming schedule without always going live in real-time.
Step 1: Start by Setting Up Your Pre-Recorded Stream
First, go to your StreamYard dashboard and click the “Create” button, just like you would for a live broadcast. From the options list, select “Live Stream.”
Step 2: Choose ‘Pre-Recorded Video’ as Your Stream Type
Instead of choosing “Studio” for a real-time broadcast, select “Pre-Recorded Video.” This option lets you use any previously recorded video as your live stream.
Step 3: Upload or Select a Video for Streaming
StreamYard allows you to either upload a video file from your computer or choose from one of your past broadcasts saved on the platform. For instance, if you’ve already recorded a session or tutorial that would be valuable to your audience, select that video to stream.
Step 4: Configure Your Stream Settings
Once you’ve chosen your video, it’s time to set up the stream details. Select YouTube as your destination, and configure the stream settings just like a live broadcast. Add a title, description, and set your privacy settings to match your goals for the stream. If you want to build hype, schedule the stream for a later time and date.
Step 5: Schedule Your Announcement Post
If you’re streaming to multiple platforms, StreamYard lets you create an announcement post to let your audience know when the pre-recorded stream will go live. Schedule this post to go out a few hours or a day before your stream time, ensuring maximum attendance.
Step 6: Engage in Real-Time During the Broadcast
Just because the video is pre-recorded doesn’t mean you can’t interact live! Join the chat as the video streams to engage with viewers, answer questions, and provide extra insights. This adds a personal touch to your broadcast and makes it feel like a true live event, even if the video is pre-recorded.
Using pre-recorded streams on StreamYard allows you to provide consistent, valuable content without the pressure of going live every time.
It’s a great way to maintain audience engagement while giving you the flexibility to manage your schedule more effectively.
Advanced StreamYard Strategies to Boost Your YouTube Growth
StreamYard offers more than just basic streaming tools—it has powerful features that can help you grow your audience and boost engagement.
Host Expert Interviews and Panel Discussions
Invite experts, influencers, or other creators in your niche to join your livestream. With StreamYard’s easy guest-invite feature, you can have multiple speakers on-screen.
Host Live Q&A Sessions with Your Audience
Q&A sessions encourage direct interaction. Schedule a regular “Ask Me Anything” (AMA) session, and use StreamYard’s comment integration to see and respond to questions in real-time.
Use the Multistream Feature to Reach a Wider Audience
StreamYard’s multistreaming lets you broadcast to multiple platforms simultaneously, ideal for expanding your content’s reach.
Leverage Screen Sharing for Tutorials and Presentations
Use screen sharing for tutorials, showing each step of a process while still displaying yourself on screen for added engagement.
Add Polls and Calls to Action to Drive Engagement
Although StreamYard doesn’t have a native polling tool, you can use banners or tickers to engage viewers with prompts like “Type 1 if you agree.”
Why Use StreamYard for Live Streaming on YouTube?
We’ve explained in detail how you can use StreamYard to live stream on YouTube.
But here’s a question.
Why use StreamYard in the first place? Why not stream directly using YouTube Studio.
While YouTube Live offers a straightforward way to broadcast, StreamYard enhances your live streaming experience by adding professional features and flexibility that YouTube alone can’t provide.
Here’s why StreamYard stands out as the better choice for creators looking to elevate their YouTube content.
1. Create a Professional Look with Branding Tools
StreamYard lets you fully customize your live stream with logos, color themes, background images, and layouts, giving your content a polished, branded look.
For example, you can add your logo in the corner, display banners to highlight key points, and use tickers to share updates or links.
This added level of professionalism builds your brand image and keeps viewers engaged, making your broadcast look more like a high-quality production.
2. Multistreaming for Greater Reach
One of StreamYard’s biggest advantages is its ability to stream to multiple platforms at once.
With multistreaming, you can broadcast to YouTube, Facebook, LinkedIn, and other networks simultaneously.
For creators who want to grow their audience, this feature is invaluable—it allows you to bring in viewers from different platforms to your YouTube channel, increasing visibility and engagement.
3. Effortlessly Manage Audience Comments
With StreamYard’s central chat interface, you can see and respond to comments from multiple channels, including YouTube, without switching tabs.
This setup makes it easy to engage with your viewers in real time, acknowledging their questions and feedback as they come in.
For example, if you’re streaming on both YouTube and Facebook, you’ll see all comments in one place, making it seamless to interact with everyone.
4. Enhanced Screen Sharing and Presentation Tools
StreamYard’s screen sharing feature goes beyond YouTube Live’s basic options. It allows you to share your full desktop, a specific application window, or even individual browser tabs.
StreamYard also offers presentation modes that let you upload slides, making it ideal for tutorials, product demos, or educational content.
You can keep viewers engaged by displaying visuals alongside your face on screen, creating a more dynamic and visually appealing experience.
5. Bring in Multiple Guests with Ease
Inviting guests on-screen can significantly boost the value of your content. StreamYard makes it simple to add up to 10 guests to your broadcast, each with customizable layouts.
Unlike YouTube Live, which has limited guest features, StreamYard lets you host interviews, panel discussions, and collaborative sessions that bring in diverse perspectives and keep viewers hooked.
6. Broadcast Pre-Recorded Content as ‘Live’ Streams
StreamYard’s option to stream pre-recorded videos as live events is a game-changer for maintaining a consistent content schedule.
You can pre-record a video, set it up as a live stream, and then engage with viewers in the chat as it plays.
This feature is not available in YouTube Live, but it’s perfect for those days when you can’t go live in real time or want to ensure high-quality production in advance.
7. Simple, User-Friendly Interface
While YouTube Live can be overwhelming, StreamYard is designed for non-technical users, making it accessible for beginners and experienced creators alike.
Its intuitive dashboard and straightforward setup mean you don’t need to navigate complex settings to create professional streams.
Everything is laid out clearly, so you can focus on creating engaging content instead of worrying about the technical side.
For creators, educators, and businesses who want to make a lasting impression, StreamYard offers a suite of tools that YouTube Live alone can’t match.
From its branding features and multistreaming options to guest hosting and pre-recorded broadcasts, StreamYard brings a level of quality and convenience that turns your YouTube live streams into powerful, professional productions.
Pros and Cons of Using StreamYard for Live Streaming on YouTube
Before you dive into using StreamYard for YouTube live streaming, it’s helpful to weigh the platform’s strengths and limitations.
Here’s a quick look at the pros and cons to help you decide if StreamYard is the right fit for your streaming needs.
Pros
- Professional Branding Options
StreamYard’s tools for adding logos, banners, color themes, and backgrounds make it easy to create a polished, branded stream that stands out. You can make each broadcast look like a cohesive, professional production. - Multistreaming Across Platforms
Unlike YouTube Live, StreamYard enables you to broadcast to multiple platforms simultaneously. This feature maximizes reach, allowing you to stream on YouTube, Facebook, LinkedIn, and other networks all at once. - User-Friendly Interface
StreamYard is designed for all skill levels, making it accessible for beginners while still offering powerful features for experienced creators. Its intuitive layout and easy-to-navigate dashboard let you focus on your content rather than technical details. - Guest Hosting and Multi-Speaker Layouts
StreamYard allows you to invite guests to join your live stream with ease, making it perfect for interviews, panel discussions, and collaborative events. The platform provides customizable layouts for different scenarios, enhancing the look and feel of multi-speaker broadcasts. - Advanced Screen Sharing and Presentation Features
StreamYard’s flexible screen-sharing options allow you to share your desktop, specific windows, or browser tabs, ideal for presentations and tutorials. It also supports slide uploads, keeping your audience engaged with visually rich content. - Ability to Broadcast Pre-Recorded Content
StreamYard’s option to stream pre-recorded videos as live events is unique and valuable. This feature is perfect for those who want to schedule consistent live content without always being on-camera in real time.
Cons
- Limited Free Version Features
StreamYard’s free version has some basic features but limits branding options, multistreaming, and guest capacity. To access the full range of features, you’ll need to invest in a premium plan, which may be a drawback for users on a tight budget. - Watermark on Free Version
If you’re using the free version, StreamYard adds its watermark to your live stream, which can affect the professionalism of your brand. Removing the watermark requires upgrading to a paid plan. - No Native Polling or Survey Features
Unlike some other platforms, StreamYard doesn’t offer built-in tools for audience polls or surveys. While you can engage viewers through comments, it lacks interactive polling, which could limit audience engagement in certain types of broadcasts. - Dependent on Internet Stability
As with any live streaming software, StreamYard’s performance is tied to your internet connection. A slow or unstable connection can impact your stream’s quality, which may be a limitation for users with inconsistent internet service. - Monthly Subscription Cost for Premium Features
To unlock StreamYard’s full capabilities, you’ll need to subscribe to a paid plan. While the investment is worthwhile for many serious streamers, it may not be ideal for those who stream infrequently or have limited budgets.
StreamYard’s pros, including its professional branding, multistreaming, and easy guest hosting, make it a standout choice for creators seeking high-quality live streaming on YouTube.
However, for those who only need basic streaming or are working with limited budgets, the subscription costs and free version limitations might be worth considering before fully committing.
Ready To Stream On YouTube with StreamYard?
StreamYard transforms the way you broadcast on YouTube, taking your live streams from basic to professional with ease.
From customizable layouts and branding elements to interactive features like real-time comments and guest hosting, it’s the ideal tool for creators looking to stand out.
Whether you’re hosting a Q&A, sharing tutorials, or collaborating with industry experts, StreamYard provides the tools to keep viewers engaged and coming back for more.
Don’t just stream—create experiences that reflect your brand, reach more people with multistreaming, and build a loyal community.
